Beauty

5 Spring Makeup Ideas You Can Actually Do Yourself

image

Ali Oshinsky, @KaliKennedy

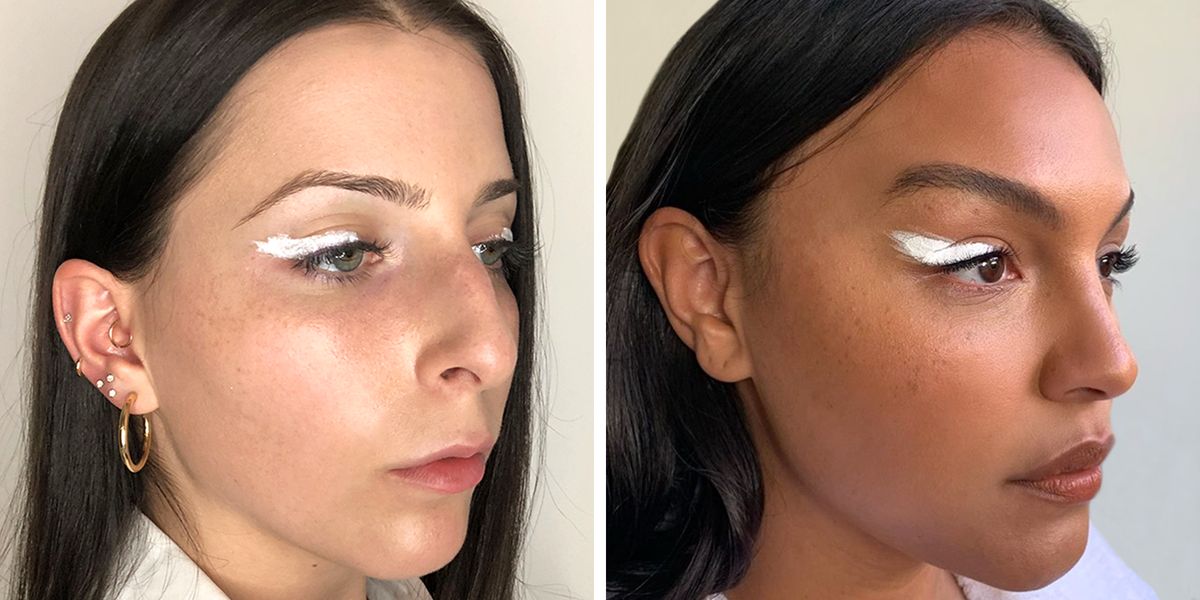
Eye makeup is so boring. Isn’t it? Case in point: if you own a palette, you’ve probably hit pan on the brown, the lighter, taupier brown, and nothing else. There’s also, of course, the issue of use. Disregarding the fact that a pressed powder in the beige family very rarely inspires the kind of heart-palpitating need-it-now type of inspiration I need even to pick up a makeup brush, eye makeup is hard. In fact, it’s the only makeup product regularly packaged with a map. And maps, unless they’re medieval ones with bizarrely humanoid dragons all over the place, are boring. Sorry, I don’t make the rules!

The people who do make the rules? That would be makeup artists. And despite what you might think, theirs are more loosey-goosey. It takes a little bit of creative scrappiness to make a look you want to look at over and over and over again—and thanks to Instagram’s save feature, I did. It wasn’t until recently that I noticed the disconnect between the eye makeup I thought I could wear and the eye makeup I liked. There’s nothing about a smoky eye that makes me feel more like me—but though ashy gray doesn’t get me going, pastel purple sure does, and canary yellow, and green like the first bunches of romanesco at the farmer’s market. My saved folder was overflowing with color.

If you’re not so into eye makeup, maybe it’s time to try something new for spring. Here are five suggestions on where to start, inspired by things I’ve saved over the past few weeks and easy enough to do with your eyes closed. And who knows, you might be surprised by how the right shade of blue can disappear into your face just as well as a neutral.

Advertisement – Continue Reading Below

Low-Maintenance Pearls

This look is by MUA Jinny Kim but I’ve been seeing variations of it all over the place. It looks impressive, maybe because we’re conditioned to think that pearls are impressive. But hey! They’re not real pearls, they’re craft pearls, and they’re made for scrapbooking so they’re sticky on their backs. It makes them super easy to use on yourself when you want your makeup to get some oohs and aahs from the peanut gallery—no lash glue required.

The Steps:

On a bare lid, peel off only the smallest pearls and place them one by one. Asymmetry makes the pearls a little less precious. Some can be in clusters, some can be on their own—just leave your lid bare (for comfort!) and focus on the areas you might use highlighter, like the corners of your eyes and under the brow bone.

The shimmery reflective pearls will bring light to those areas the same way your favorite illuminator does. Brush up your brows and add mascara to finish, and keep the rest of the look nude and natural.

Absolutely Not A Cat Eye

Cat eyes. They’re tough! Luckily, this has nothing to do with ‘em… sort of. The difference is that while winged liner is all about perfection, this look (done first by makeup artist Kali Kennedy on model Paloma Elsesser) leans into the potentially shaky/messy/fundamentally imperfect way you put on liner when you’re not a pro.

The Steps:

Using a white eyeliner from Fenty, I started making short, chunky lines starting from the middle of my eye (use your pupil as a guide) outwards.

Once I reached the edge of my iris, I started angling my strokes upwards to the ends of my brows.

After you’ve got the basic shape go back in and add some concentrated white to the wing and along the lash line. The bright white reads clean but a bit of shine on the lip and natural skin texture say, “Oh this liner? I just threw it on.” No perfect edges here!

Easy To Wear Rainbow

Makeup artist Shayna Goldberg did this look on beauty writer Rio Viera Newton in October, and I haven’t stopped thinking about it since. To make the look more wearable for everyday, I used eyeliners instead of shadow (more control) and kept the pigment concentrated close to my lash line.

I used three from Colourpop, but you can make this work with any colored liners—and really, any three shades adjacent to each other on the color wheel. And you’re also going to want to have Q-tips on hand, for smudging. They’re harder than brushes, and will blend out fast-settling liners easier.

The Steps:

Starting with blue Prance, I made thick, imprecise strokes on a little more than a third of my eye and quickly blended the top of the line with the Q-tip to avoid a harsh delineation between the color and my lid. Then I did the same thing with the pink, Boots, in the inner corners of my eyes to about the outside of my iris. To blend the two shades, color in the middle with yellow Crssd and overlap the blue and pink lines a little bit—like coloring with crayons, blend them by adding more color. (No Q-tip required for this step.)

You might need to go back in with the other shades (and then maybe again with the yellow) to get a soft blend, depending on how fast you work and how malleable your eyeliner’s formula is. Either stop there, or repeat with a thinner line on the bottom lashes. Finish with your mascara of choice on your top and bottom lashes.

Dreamy Sherbert Shadow

I used two 5 Couleurs palettes from Dior’s new spring collection, Pink Vibration and Blue Beat, because I had them and because, [to paraphrase John Mayer, you only need the little brushes it comes with. Other options with all the colors in one place are Shroud Cosmetics’ Creepy Cute palette (it’s what MUA Grace Ahn used to create the look) and Fenty’s new Snap Shadows in No. 8—or use eyeshadow singles you might already have. Truly, there are no rules here.

The Steps:

Pick a color and pack it onto the middle of your lid up to the crease in a vertical line. This looks coolest when your lids are asymmetrical, so start with a different center color on each lid. Don’t worry about blending right now—you’ll do that at the end. The only important thing is that the brushes you use for each color are clean and don’t muddle up the pastels. Repeat with shades next to it on the color wheel on either side, so they’ll blend into each other more smoothly.) Once your lid is covered, take a big fluffy brush and buff out your crease to keep the design soft. Finish with mascara just on your top lashes, or let the look stand on its own.

A Clashing Eye + Lip

The final look is the easiest to accomplish, but maybe the most daunting to pull off. That’s because while red lips and blue shadow are an objectively winning combo on all skin tones and it’s also the makeup du jour of the clown set. To keep the look wearable, apply matte color in washes.

The Steps:

With a fluffy brush, sweep a sheer coat of shadow on just the lid, blending up and out towards the crease. I like to use Subterranean from the Claropsyche Psyche’s Box palette, but Rihanna, of course, used her Fenty Beauty palette.
Finish with a coat of mascara. Then, for the lip, apply your favorite red with your fingers to keep it soft. Rouje’s Palette is made for that (and you can mix shades to get your perfect red) but you can use something Fenty Stunna Lip in Uncensored. A neutral, bronzey blush like Kosas Tropic Equinox ties your brights together. The look is surprisingly timeless.

Advertisement – Continue Reading Below

Products You May Like

Articles You May Like

My Honest Review of LeVaye’s Teeth Whitening Polar MD: Is It Worth the Hype?
The Top 5 Eyelash Serums That Medical Aestheticians Actually Recommend

Leave a Reply

Your email address will not be published. Required fields are marked *